


- 11/25/2016
- 0 Comments
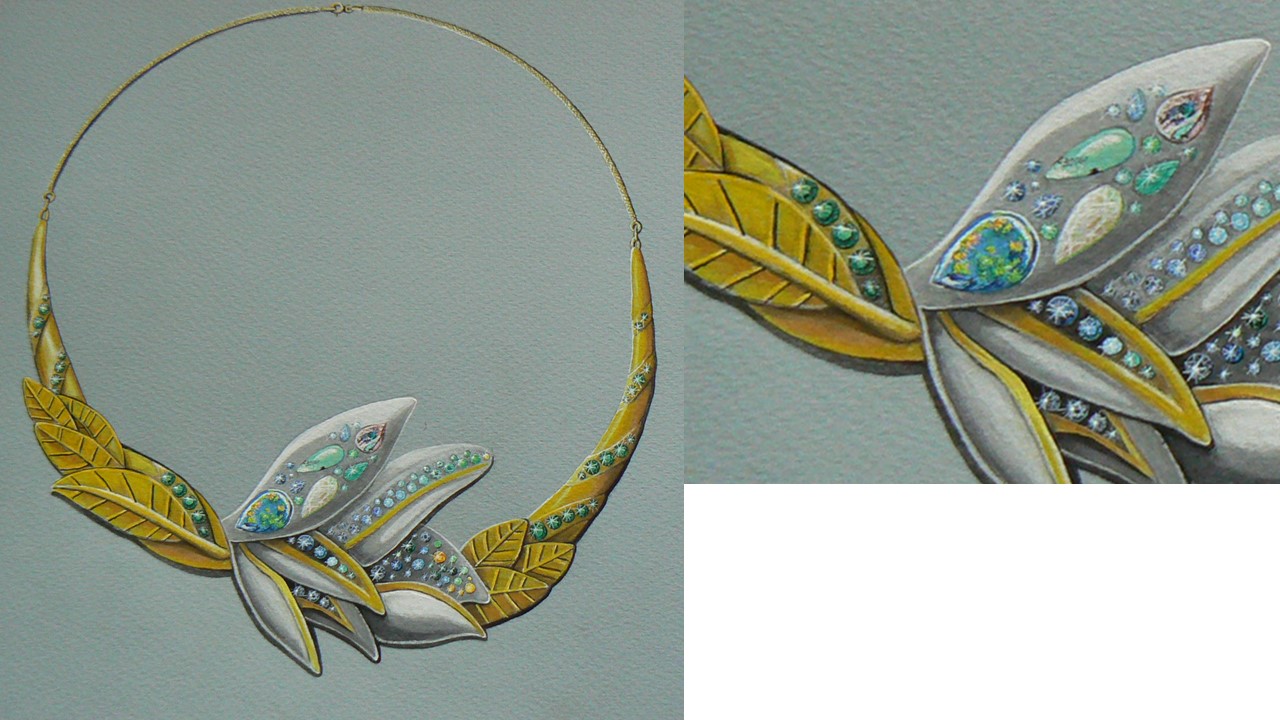
I'm happy to say that I made a substantial amount of development work
and finally moved on to rendering the final collection. I was so focused
on work that I nearly forgot about my birthday (9th August)! To
celebrate good progress I scanned and photographed some of the things
I've been working on, so today's post will be featuring models, more of
my design development drawings, and a small sneak peak of final
renderings.
Enjoy!


 Looking back at my process of rendering (in pictures) I'm quite surprised to notice that I don't have a single way of working. I sort of go back and forth between designs; I might do a bit of shading here or add some colour there. I generally add gouache highlights when all designs are drawn out and coloured in; but it's always pretty much about whatever works for you.
My main tips for anyone interested in rendering will be - get templates to draw gems nicely, keep a scalpel close by when rendering in coloured pencil to ensure the tip is sharp, cover paper you're not currently working on so you don't smudge design. Listen to the music. Stay focused.
Enjoy!


My main tips for anyone interested in rendering will be - get templates to draw gems nicely, keep a scalpel close by when rendering in coloured pencil to ensure the tip is sharp, cover paper you're not currently working on so you don't smudge design. Listen to the music. Stay focused.
Stay golden!!!
- 8/11/2016
- 0 Comments
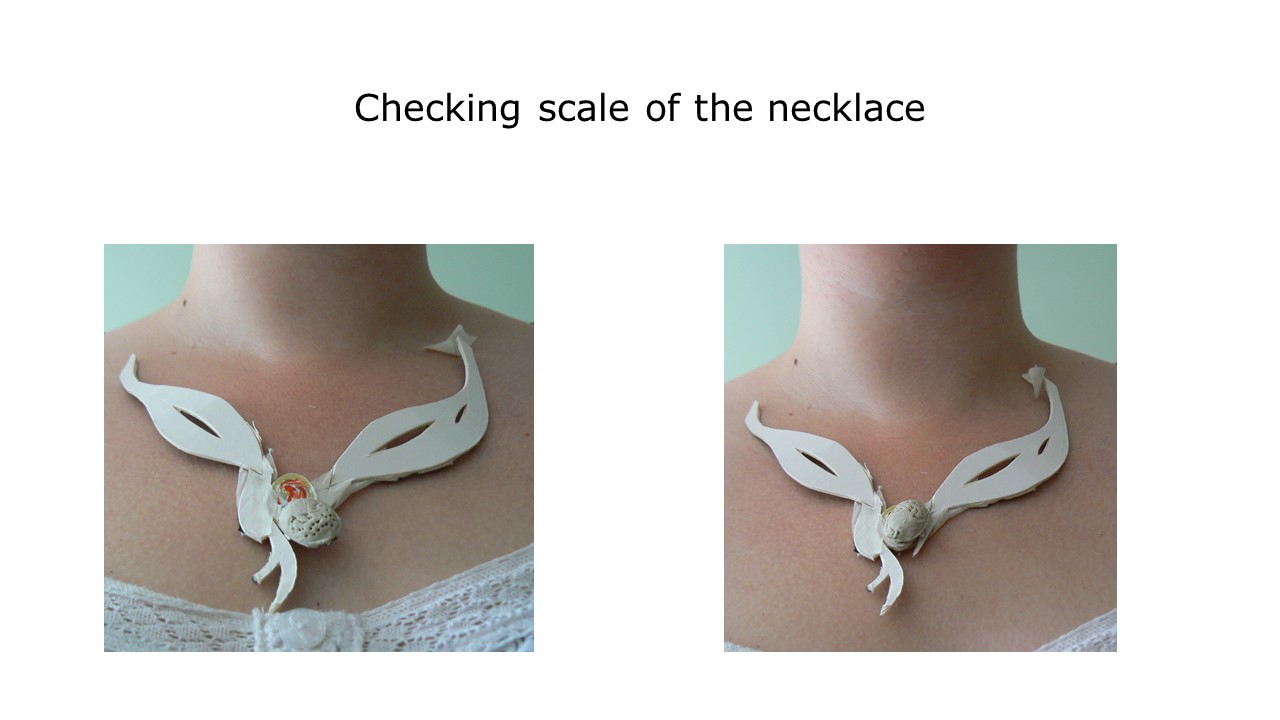
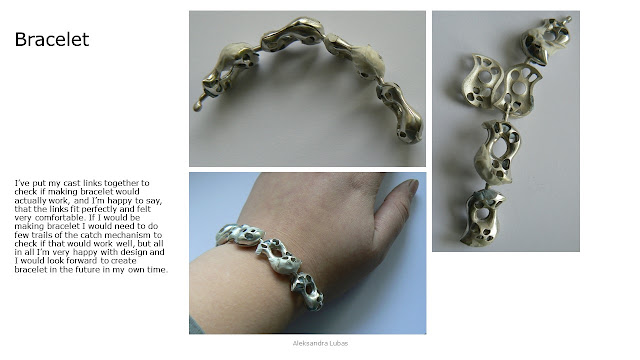
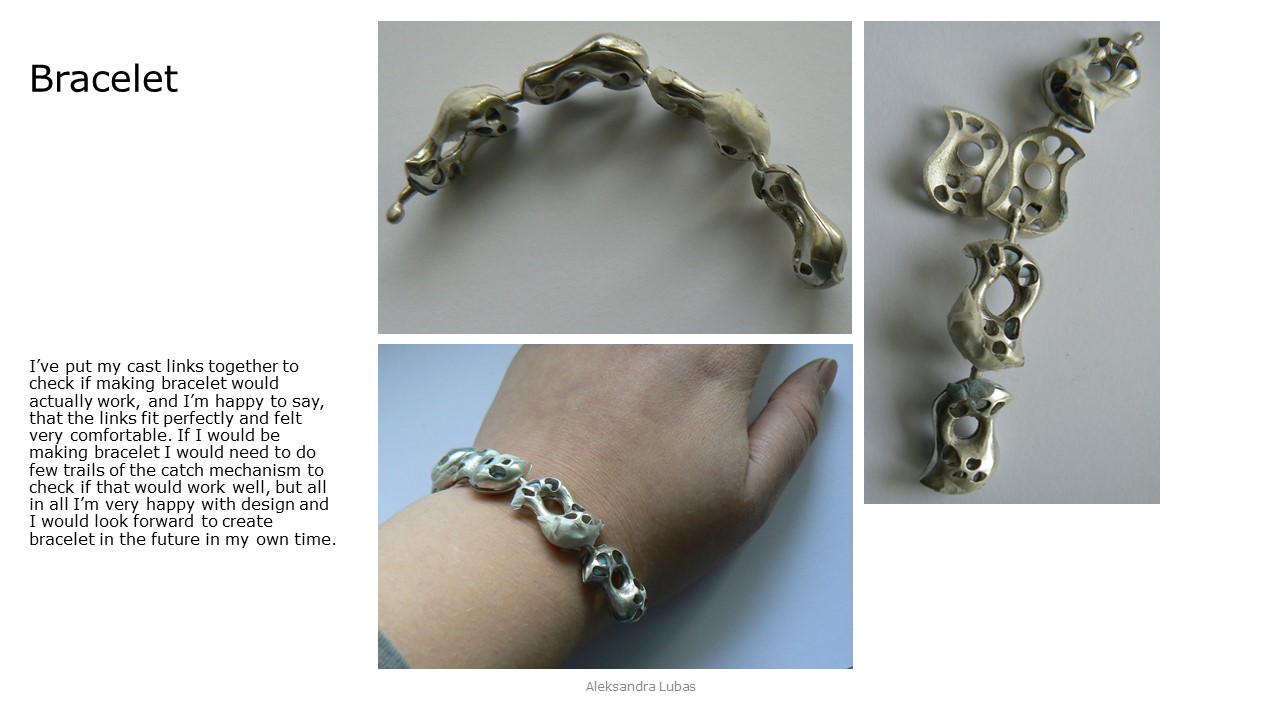
It's possible that I didn't talk about it previously, but I decided
against making bracelet from Dissolve Collection, with main reasons
being the cost of production and time - that's why for final piece I've
been making pendant. It's been quite a long process, and... Well maybe
I'll start with some visuals:


As you can see it's pretty much done - nothing is as satisfying as seeing your design come to life - feel its heaviness, how solid it is...
As a side note, I've completed laser welding task, so I can finally share with you what it was about. We received the same cast ring with missing claws (at least some of them were, but majority was just cast too well) and we were to drill a hole for silver wire to thread through, laser weld it, and fill two last holes on the shoulders. It was pretty straightforward, and not too difficult (although because of the way welder is positioned, I found it difficult to reach properly inside it, leading me to believe that my arms are too short).

As to laser welder - it allows you to join two same metals together - works great with
gold, steel and silver - other metals - I haven't tried, but I heard they are more difficult to fuse together. So it's pretty much soldering, but without torch, flux and solder. Solder doesn't work well with laser welder. During welding, you put your piece and arms inside chamber, look through sockets to see it from close up, and using centre of the cross on the socket, you press pedal to turn laser beam on - a bit like sewing machine. Laser beam fuses two edges - if that's what you wanted to achieve, or fills in holes. To fill in hole, you need finest filler wire from the same material as the piece you try to fill in and position it so it's at an angle (laser beam stays in the same spot, going straight down). It's great when you need to weld small pattern, or entrap heat sensitive material - like a pearl. A great tool to have - I wish I had one at home.
That will be all for today - be on the lookout for the next post!
Stay golden!!!
- 1/27/2016
- 0 Comments
Since I finally have photo of my
laser engraved ring, I can finally talk about laser technology
introductory tasks I had during the first week of the project. I won't
talk about laser scanning, cause I don't have any pictures from that and
laser welding - mainly because I haven't finished that task yet.
To start off - laser cutting is a technology allowing you to cut material - mainly sheets of plastics, wood, textiles and metals - according to your design. It allows fairly big precision, but there are some rules to remember. Laser recognizes lines depending on colour. Red is for cutting, black for raster and blue for engraving - at least that's how our school laser works. For that task we were to design Christmas decoration for cutting in clear perspex - either flat or 3D one. I decided straight away to design a snowflake in Rhino. Below, the last one on the right is my final file ready for cutting.
 And below my lovely snowflake - it was good thing that I designed with
consideration for hanging, as the slot for some reason came out too big.
Thankfully, pretty blue ribbon sorted everything out!
And below my lovely snowflake - it was good thing that I designed with
consideration for hanging, as the slot for some reason came out too big.
Thankfully, pretty blue ribbon sorted everything out!
 For laser sintering we were to design singular form in T-splines (which I
like slightly better, but not enough to leave ArtCam). Direct metal
sintering is slightly similar to printing, in how it works layer by
layer - the difference is, you can work directly in metal, and instead
of nozzle heating up plastic to layer up, here the machine spreads layer
of powder (for example gold) and laser traces the shape of your design melting powder to form solid form.
And it repeats and repeats until whole product is created - it's quite a
long process, especially if the piece is large or complex. It allows
you to create forms you couldn't do easily with casting, as well as make
chains or bracelets as you can design links already joined - as long as
you leave some space for the powder to be blown away, at least. The
thing to remember is - the finish is not as good as with casting, so
with more complex forms you might not be able to polish fully. The last 3
images from bottom right is my tiny model sintered in nylon by Digits 2
Widgets - London based company.
For laser sintering we were to design singular form in T-splines (which I
like slightly better, but not enough to leave ArtCam). Direct metal
sintering is slightly similar to printing, in how it works layer by
layer - the difference is, you can work directly in metal, and instead
of nozzle heating up plastic to layer up, here the machine spreads layer
of powder (for example gold) and laser traces the shape of your design melting powder to form solid form.
And it repeats and repeats until whole product is created - it's quite a
long process, especially if the piece is large or complex. It allows
you to create forms you couldn't do easily with casting, as well as make
chains or bracelets as you can design links already joined - as long as
you leave some space for the powder to be blown away, at least. The
thing to remember is - the finish is not as good as with casting, so
with more complex forms you might not be able to polish fully. The last 3
images from bottom right is my tiny model sintered in nylon by Digits 2
Widgets - London based company.
 Last but not least - laser engraving task was to design pattern for ring
using Coral Draw, buy or make silver, flat ring and take it to laser
engraving company - Geti (they are located in Jewellery Quarter,
Birmingham). Laser engraving is pretty much engraving with laser - you
can either engrave 3D form or 2D flat engraving which is what we were
doing. My design was magpies - because they are one of my favourite
birds. I'm very happy with my ring - the level of detail one can achieve
with laser engraving is incredible!
Last but not least - laser engraving task was to design pattern for ring
using Coral Draw, buy or make silver, flat ring and take it to laser
engraving company - Geti (they are located in Jewellery Quarter,
Birmingham). Laser engraving is pretty much engraving with laser - you
can either engrave 3D form or 2D flat engraving which is what we were
doing. My design was magpies - because they are one of my favourite
birds. I'm very happy with my ring - the level of detail one can achieve
with laser engraving is incredible!

To start off - laser cutting is a technology allowing you to cut material - mainly sheets of plastics, wood, textiles and metals - according to your design. It allows fairly big precision, but there are some rules to remember. Laser recognizes lines depending on colour. Red is for cutting, black for raster and blue for engraving - at least that's how our school laser works. For that task we were to design Christmas decoration for cutting in clear perspex - either flat or 3D one. I decided straight away to design a snowflake in Rhino. Below, the last one on the right is my final file ready for cutting.


Stay golden!!!
- 12/28/2015
- 0 Comments
School of Jewellery became a host of the ‘New Jade and East Meets West’ exhibition showcasing designs from ten Chinese graduates of the School of Jewellery. Exhibition explores the symbolism of the Chinese ping'an pendant - a piece of jewellery containing jade.


As part of the exhibition there has been a series of lectures and talks, as well as jade carving demonstration.
So what have I learned about jade and jade carving?


What can be accomplished with hard work, concentration and patience is astonishing - jade carving is a wonderful form of art.
I hope you enjoyed it as much as I did!
Stay golden!
- 10/21/2015
- 0 Comments
Last week on Wednesday and Thursday in Birmingham annual TCT Show took place in the National Exhibition Centre (NEC). I was fortunate enough to go, and before I go deeper into my personal experience of it, a bit of background information.
 TCT Show, which celebrated its 20th anniversary this year is an international event bringing forth new technologies, applications and innovations. There is a lot of focus on the additive manufacturing, 3D printing, prototyping, product development, software, scanning and digitising.

It was fascinating to see how far technology moved forward - various 3D printing machines and products that I've seen on the show were truly amazing. Seeing how I'm studying Design for Industry, you might ask: What does it have to do with designing? Well, best designers are not only imaginative, creative people, designing products - they also know how the products would be produced. What's the point of designing product which you couldn't bring to market because it would be too difficult to produce? So knowing technologies available to you is vital in a design.

It's good to know that thanks to 3D printing you can create prototype of jewellery that can be easily cast afterwards - it saves you some time, unlike wax carving or making metal and milliput model, and adds more precision to model, because machine works directly from CAD design.
To learn bit more about 3D printing - how it works and it's applications, watch video below:
It was also great to hear about possibility of scanning 3D objects and turning them into CAD models - it's interesting idea and gives you a lot of room to play with - the options for application are huge.

Watch video below to see how it works:
All in all, TCT Show was worth going to - technologies I saw were wonderful, products manufactured using these technologies - even more so. If you get a chance to go next year - go and see what's out there - you will be pleasantly surprised.
That's everything for today.
Stay golden!!!
- 10/04/2015
- 0 Comments
Annealing is very important technique and one needs to know about it before starting to work with metal. Let's start with theory.
When you work on metal through hammering or other forms of compression, molecules making your piece up are also compressed, eventually becoming non-malleable (hard to bend) or to put it using different term - work hardened. If you try to work on work hardened metal there are big chances that you will crack it.
You can buy pre-annealed metal, but if you have a lot of forming to do - and that's what usually happens, unless all your pieces are flat- you are better off learning about annealing.
Annealing should be done in slightly darkened room - it's easier to see the colour change of metal.
Tools needed for annealing are : soldering block, torch, reverse action tweezers, piece of metal for annealing and a jar of water.
 Health and safety issues are just common sense - don't touch heated metal with your hands - use tweezers. Don't touch the flame or put your hands close to it. Don't keep any flammable materials close to annealing area. Crack window open for good ventilation. Stay focused.
First step of annealing: Put your work on soldering block and heat metal according to table below, using torch. The torch flame is hottest at the very point of blue flame, so try to keep that area on metal. Observe colour change carefully, and as soon as whole piece is correct colour (usually variation of red), turn torch off.

Second step of annealing: grab metal with reverse action tweezers and either quench - put into jar of cold water - or allow to cool slowly (you can speed up process by putting it on steel block).

Different metals are annealed in different way.
When you work on metal through hammering or other forms of compression, molecules making your piece up are also compressed, eventually becoming non-malleable (hard to bend) or to put it using different term - work hardened. If you try to work on work hardened metal there are big chances that you will crack it.
You can buy pre-annealed metal, but if you have a lot of forming to do - and that's what usually happens, unless all your pieces are flat- you are better off learning about annealing.
Annealing should be done in slightly darkened room - it's easier to see the colour change of metal.
Tools needed for annealing are : soldering block, torch, reverse action tweezers, piece of metal for annealing and a jar of water.

First step of annealing: Put your work on soldering block and heat metal according to table below, using torch. The torch flame is hottest at the very point of blue flame, so try to keep that area on metal. Observe colour change carefully, and as soon as whole piece is correct colour (usually variation of red), turn torch off.

Second step of annealing: grab metal with reverse action tweezers and either quench - put into jar of cold water - or allow to cool slowly (you can speed up process by putting it on steel block).

Different metals are annealed in different way.
Metal
|
Annealing method
|
Low – carat gold alloys
Sterling silver
Fine silver
Copper
Gilding metal
|
Heat to a dull, cherry
red and quench as soon as redness disappears.
|
White gold
Brass
|
Heat to bright red
and cool in the air – do not quench.
|
Aluminium
|
Coat surface with soap and heat until it turns black – allow to cool slowly.
|
Mild steel
|
Heat to red
heat and allow to cool slowly.
|
Annealing isn't difficult - just remember to observe colour change and take heat down at the right moment.
That's all for today.
Stay golden!
That's all for today.
Stay golden!
- 8/14/2015
- 0 Comments


